4. Creating an abbreviation table
This chapter explains the core operations, from loading the document to creating an abbreviation table.
4.1 Loading abbreviations
Selecting the [Load] button scans the document, extracts abbreviations, and lists them in the abbreviation grid.
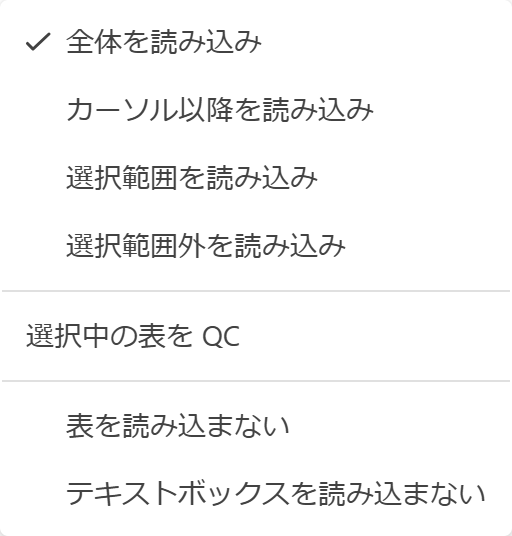
Specifying the load scope
Pressing the [Load] button itself scans using the currently selected scope mode. The expansion menu beside the button lets you switch the scope mode and configure exclusions.
| Menu item | Contents |
|---|---|
| Load entire document | Scans the paragraphs of the entire document. |
| Load selection | Scans only the selected paragraphs. |
| Load outside selection | Scans the paragraphs outside the selected range. |
| Load after cursor | Scans from the cursor position to the end of the document (the initial default). |
| Skip tables | Excludes tables from scanning. |
| Skip text boxes | Excludes text boxes from scanning. |
| QC selected table | Compares the selected abbreviation table against the abbreviation dictionary (for details, see 9.2 QC of the abbreviation table). |
The selected scope mode and exclusion settings are retained as the default behavior of the [Load] button and restored at the next startup. Hovering the mouse over the [Load] button shows a tooltip summarizing the current scope mode and exclusion settings (e.g., "Load after cursor (skipping tables, text boxes)").
Display while loading
While loading, the operation controls are temporarily disabled and a progress banner is shown at the top of the task pane (guiding you through stages such as loading the dictionary → scanning the document → detecting repair issues). When loading completes, the progress banner disappears automatically.
When there are unsaved edits
If you run a load while there are unsaved edited items, a confirmation dialog appears stating that the edits will be discarded. If you proceed, the edits are discarded.
Confirmation when no project is specified
In an environment where a project dictionary is configured, if you try to load with no project specified, the confirmation dialog "No project is specified. Do you want to proceed with loading?" may appear (whether it appears depends on the Master rules settings).
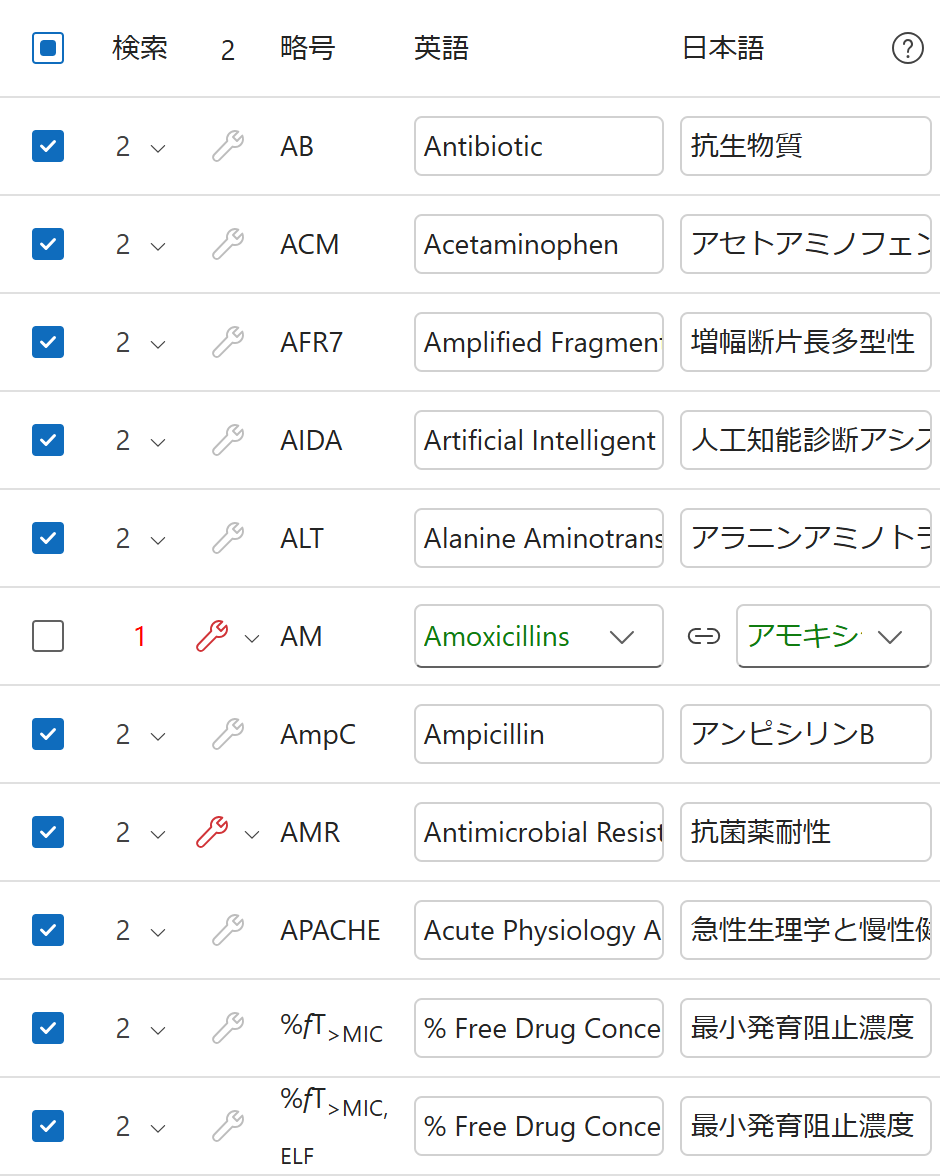
4.2 Selecting abbreviations to output
From the loaded abbreviations, select those you want to output to the abbreviation table.
Selecting with check boxes
Items whose check box you select become output targets. Clearing the check excludes the item, and that excluded state is retained at the next load (restoring the check cancels the exclusion).
Abbreviations used only once: When "Check abbreviation usage count" is enabled in the settings, items used as an abbreviation only once in the document do not need to be output to the abbreviation table, so they are unchecked automatically at load time (this applies only to exactly one use and does not depend on the threshold value). To include them in output, check them again manually.
Adding an abbreviation (drag and drop)
To include an abbreviation that was not extracted by loading, select the abbreviation in the body and drag and drop it onto the abbreviation grid to add it as an abbreviation item. If the selection spans multiple paragraphs, an item is registered per paragraph. The added item (the first one, for multiple paragraphs) becomes selected, and the grid scrolls automatically to that row.
If the dropped abbreviation is already registered in the abbreviation dictionary, it is shown with its English and Japanese terms filled in (if it is not registered, it is added as an item with empty terms, which you can fill in later).
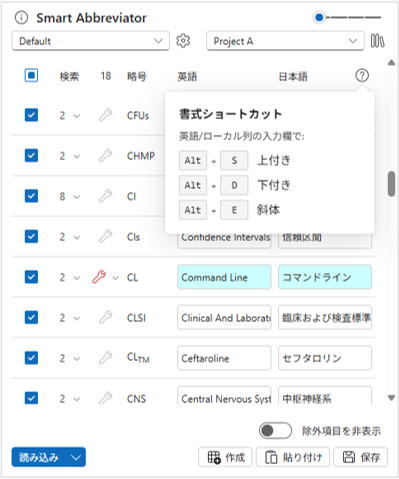
Editing terms
The English and Japanese columns can be edited inline. In the editing area you can apply italic, superscript, and subscript formatting. The formatting can be toggled with the following keyboard shortcuts (you can also show the list from the [?] icon in the local column header).
| Shortcut | Formatting |
|---|---|
| Alt + E | Italic |
| Alt + S | Superscript |
| Alt + D | Subscript |
Once confirmed, the change is reflected in the term, and the term cell background is shown in light blue as edited.
If you drag and drop a selection from the document onto the editing area of the English or Japanese column, the term value is replaced with the dropped text (including its formatting).
Selecting among multiple candidates
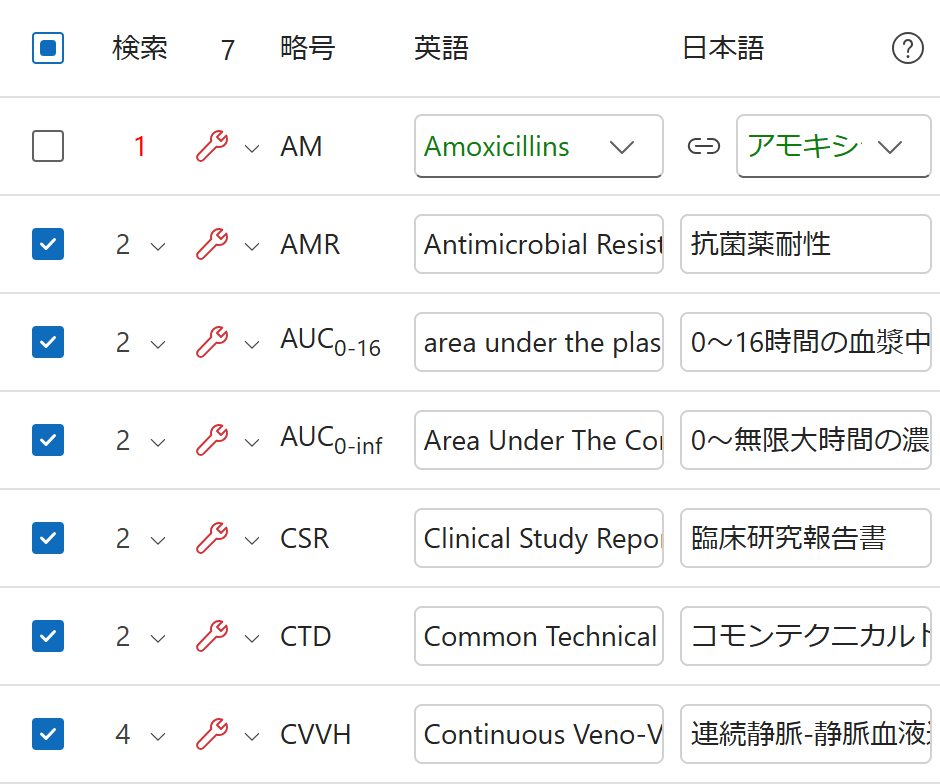
For an abbreviation that has multiple candidates (pairs of an English term and a Japanese term) in the abbreviation dictionary, a combo box for selecting a candidate is shown.
- If the full term in the document matches one of the candidates, that candidate is selected initially and the term cell is shown in light blue.
- If it matches none of the candidates, the term cell is shown in green, and the candidate from the highest-priority layer in the hierarchical dictionary (Personal > Project > Master > auxiliary) is selected initially.
When you select a candidate, the English and Japanese terms are updated to the contents of the chosen candidate.
This combo box supports not only selecting a candidate but also editing by direct input. If you want to use a term that is not among the candidates, you can type directly into the combo box to edit the term (the edited term is shown as edited, with the term cell background in light blue).
Link icon: Rows with multiple candidates show an icon that links the candidate selection of the English and Japanese columns. The default is linked (on); selecting a candidate switches the English and Japanese together. Selecting the icon to unlink lets you select the candidates of the English and Japanese columns independently (returning to linked aligns the Japanese side to the English side's candidate).
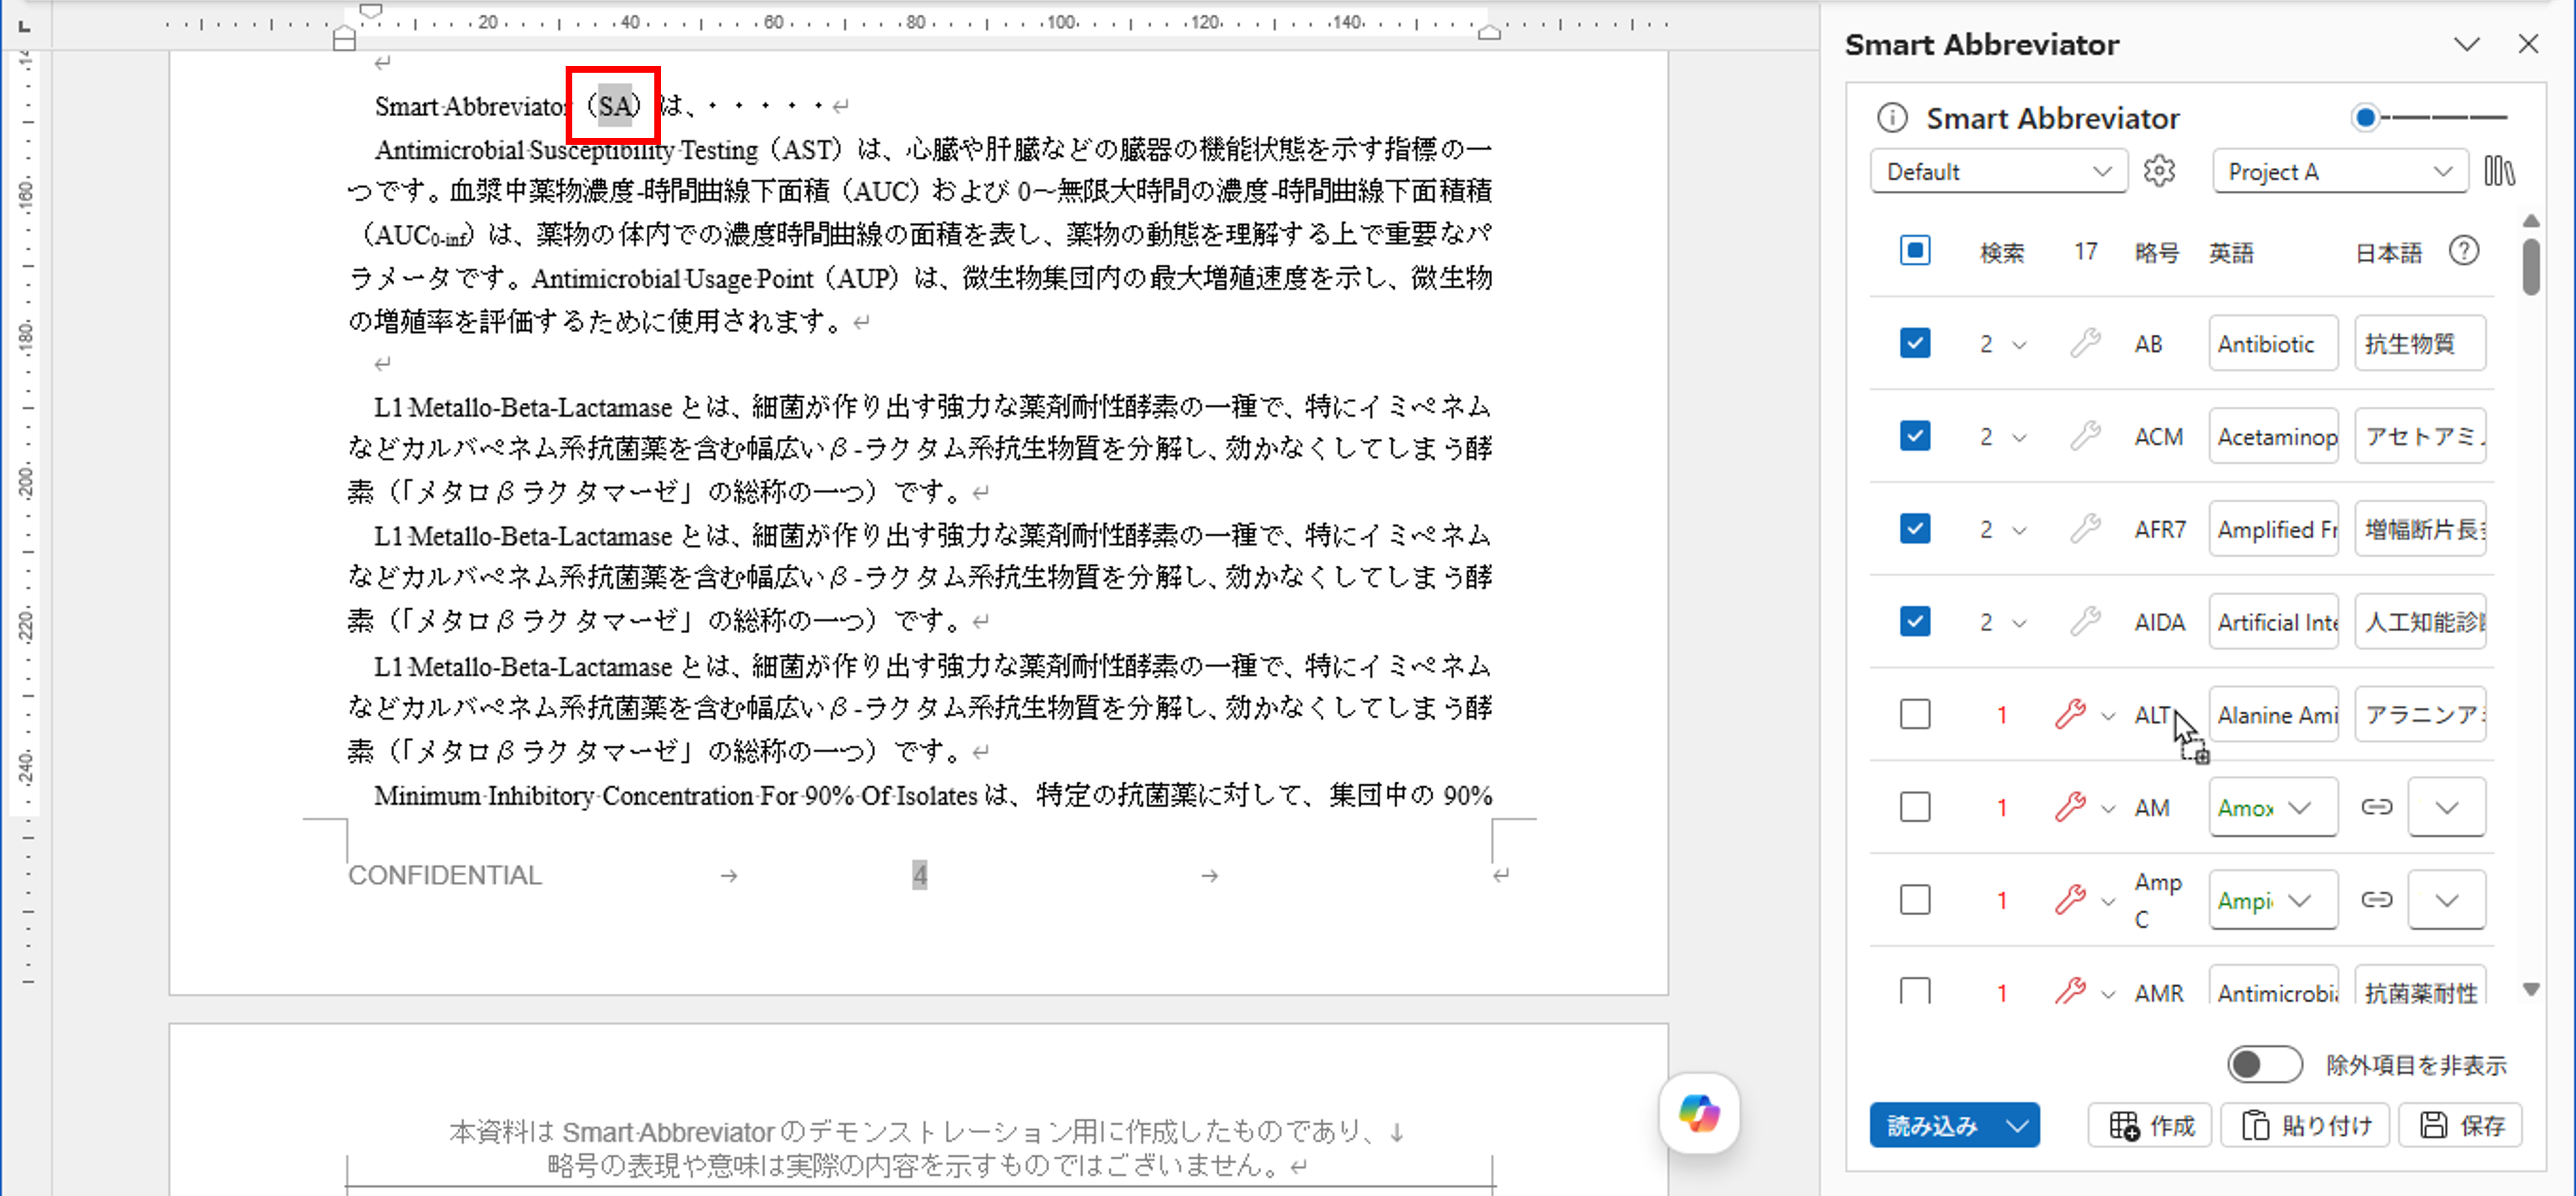
4.3 Reviewing and repairing with the full-term check
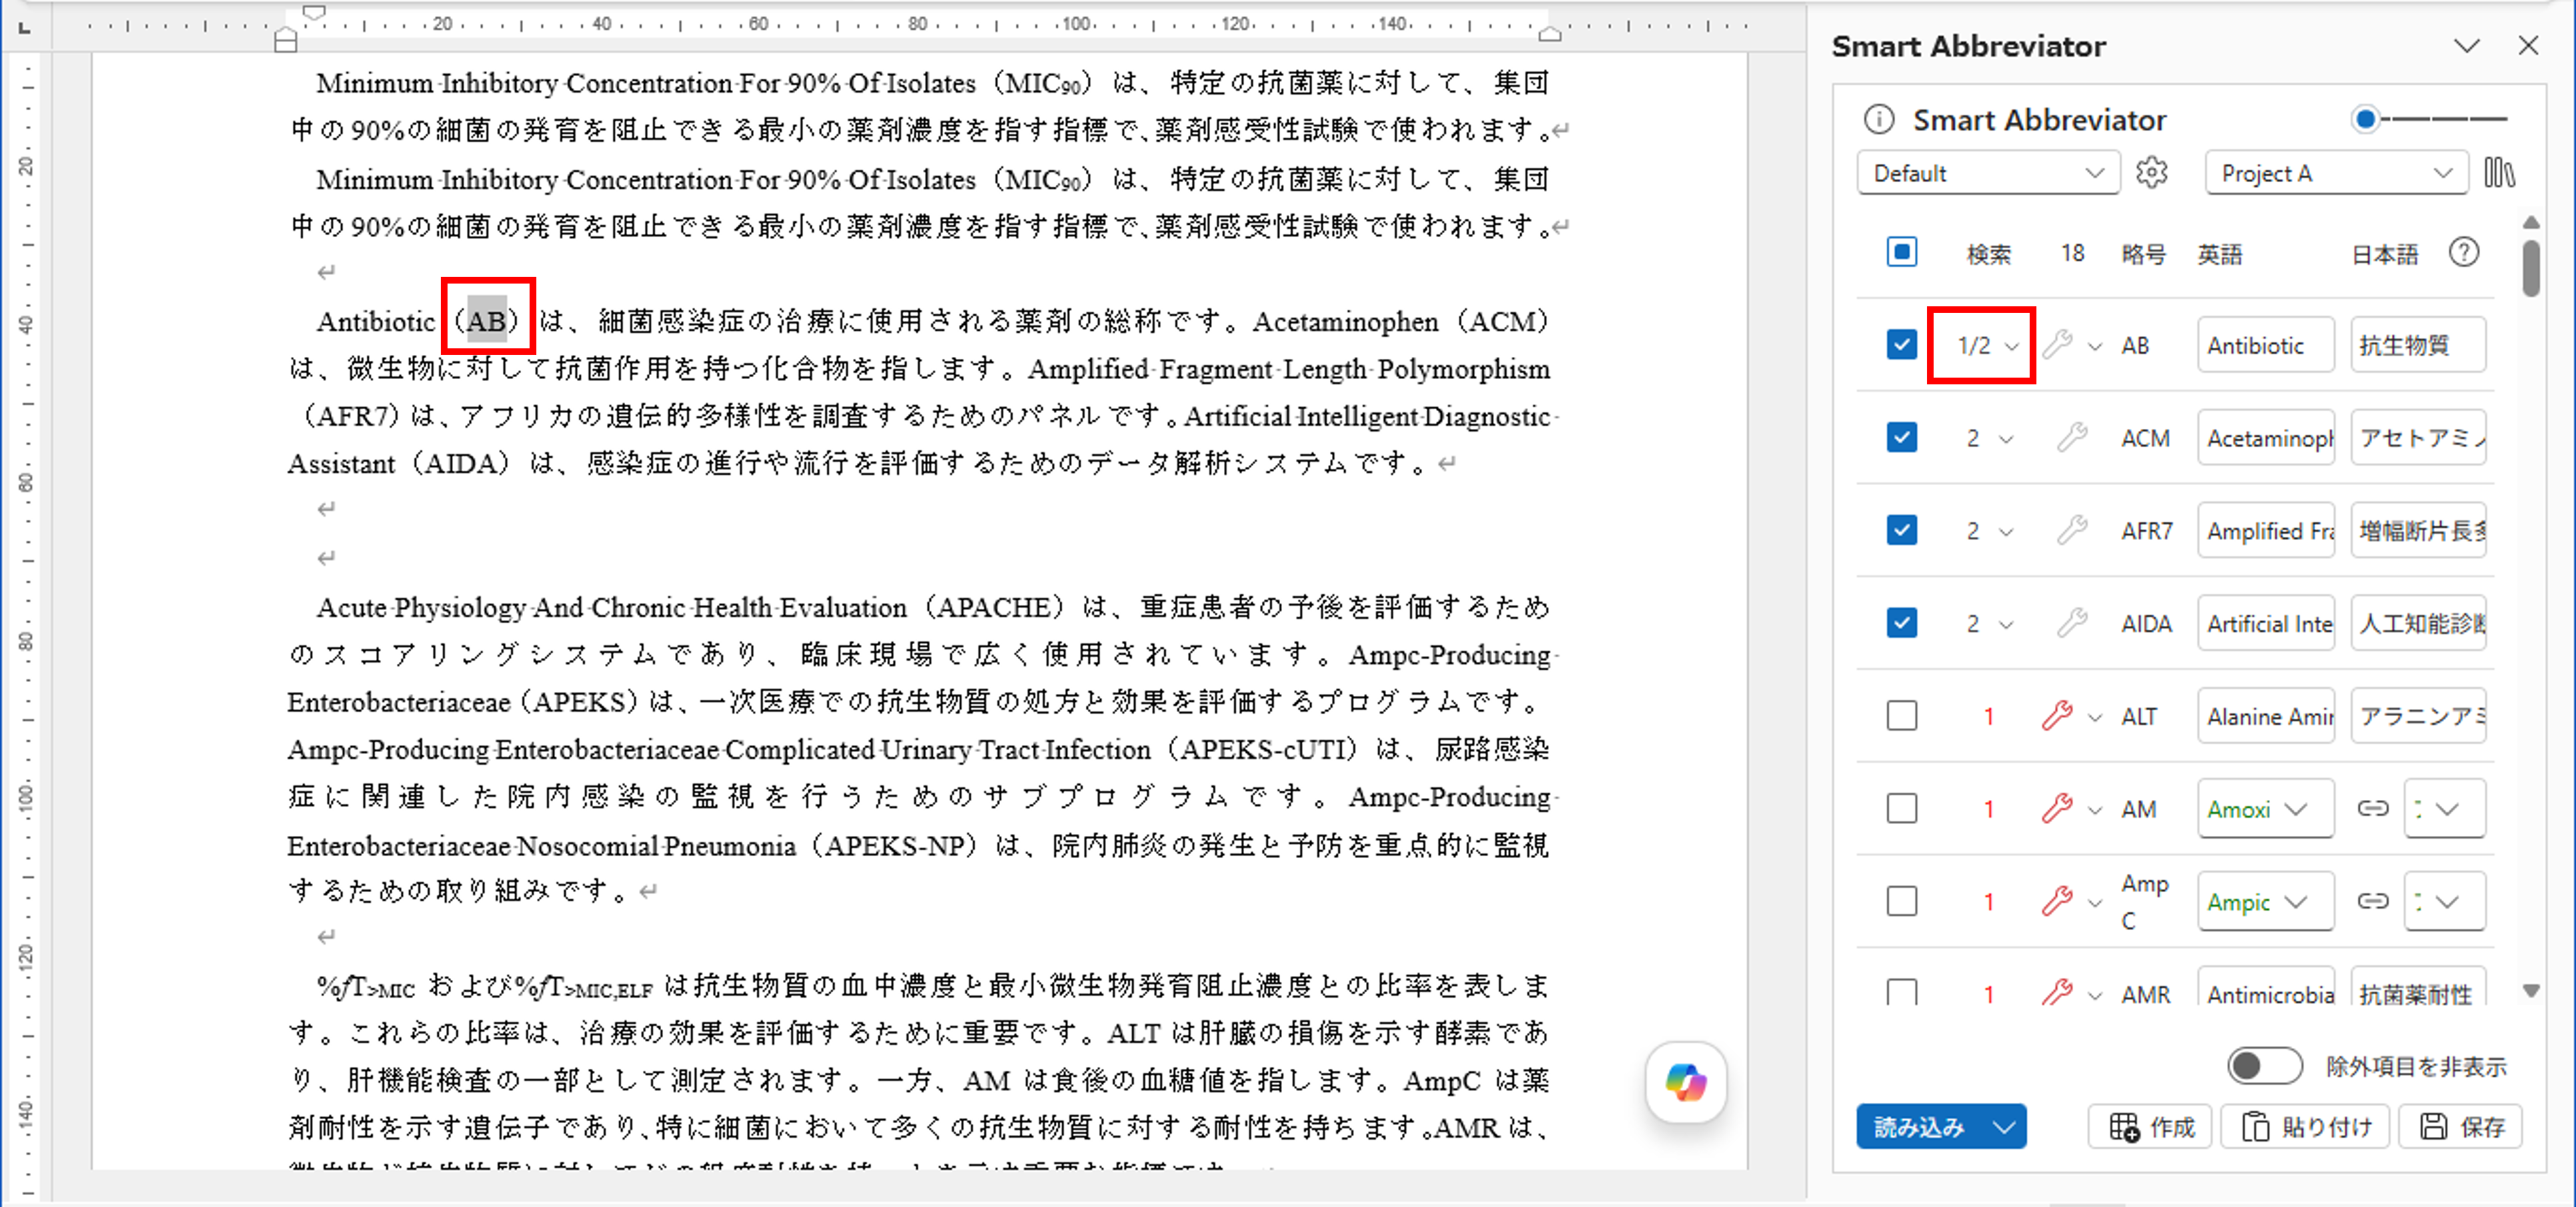
For the extracted abbreviations, deviations from notation rules (repair issues) are detected. An item with an unresolved repair issue shows the repair button (the wrench icon) in red.
Repair issues that are detected
| Detected content | Default repair method |
|---|---|
| The full term is not written | Insert the full term at the first occurrence |
| The full term does not match the abbreviation dictionary | Replace the full term at the first occurrence with the dictionary value |
| The full term is written somewhere other than the first occurrence | Insert the full term at the first occurrence (and delete the duplicate) |
| The full term is written two or more times | Delete the full term at the non-initial occurrences |
| Only the full term is written, without the abbreviation | Replace the non-initial full-term occurrences with the abbreviation |
| The abbreviation is used only once | Delete the abbreviation, or replace it with the full term |
Cases that cannot be repaired: For a document-derived abbreviation whose English and Japanese terms are both empty (an abbreviation not registered in the dictionary), there is no dictionary term to insert or replace, so full-term insertion and replacement issues are not detected and the repair button is disabled. If you enter terms in the grid after loading, the repair issues are re-detected according to those terms.
How to run a repair
The following repair methods are available.
- Individual repair: Select the repair button of a row that has a repair issue.
- Batch (sequential) repair: Selecting the Repair column header ("n items need repair") presents and repairs the remaining issues one by one.
- A specific repair step: From the row's repair menu, choose and run a specific repair step.
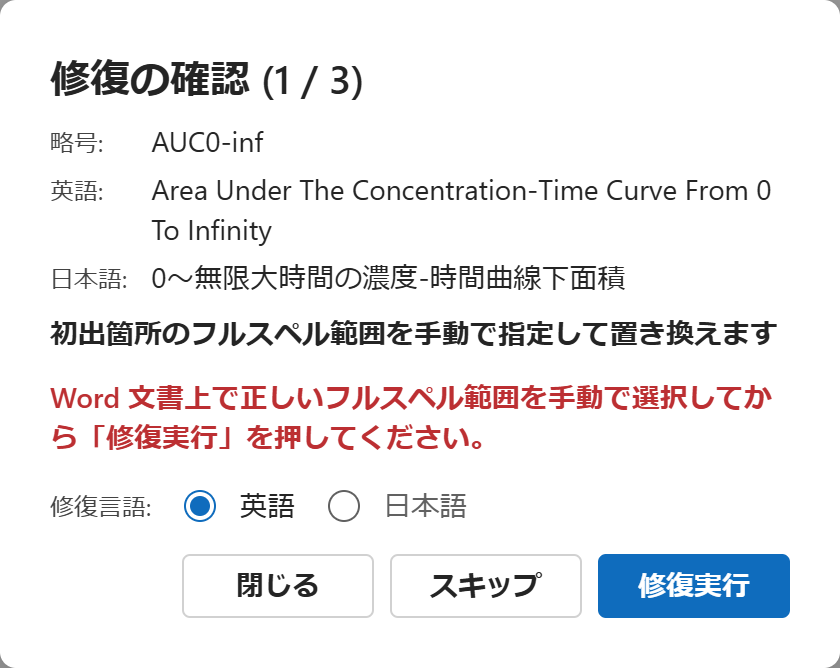
Repair confirmation dialog
Before a repair, a confirmation dialog appears, showing the target abbreviation, English term, and Japanese term, along with the repair step about to be performed.
- Repair language: The English / Japanese radio buttons let you choose the language used for the repair. The default is that language if a term is registered in only one language, and otherwise the language-detection result of the target range. If a term is registered in only one language, the other cannot be selected.
- Manual selection: If the full-term range cannot be determined automatically (it is ambiguous), you are guided with "Please manually select the correct full-term range in the Word document, then press 'Run repair'." Select the correct range in the document, then press [Run repair].
- [Skip] proceeds to the next issue, and [Close] ends the repair.
For an item whose repair is complete, the repair button becomes disabled (dimmed).
Tracked changes: Whether changes during a repair are recorded as tracked changes follows the settings.
4.4 Search
You can search the document for the extraction locations of a selected abbreviation and move to them. The [Search] button itself performs "search next," and the menu beside the button lets you choose the following modes.
| Mode | Contents |
|---|---|
| Search next | Move to the next occurrence. |
| Search previous | Move to the previous occurrence. |
| Search first | Move to the first occurrence. |
| Search last | Move to the last occurrence. |
| Search after cursor | Move to the first occurrence at or after the current cursor position. |
When you run a search, the current search position ("Searching (current / total)") is shown, so you can see which occurrence you are on. The relevant occurrence is selected (highlighted) on the document body side, and the view scrolls to that position.
When the paragraph structure changes: If paragraphs are added or removed after loading, the reference positions for search and repair become stale, so a warning message appears and the search and repair buttons of the affected rows are temporarily disabled. Running [Load] again clears this. Note that if you only edit part of the text within a paragraph, search continues to work correctly.
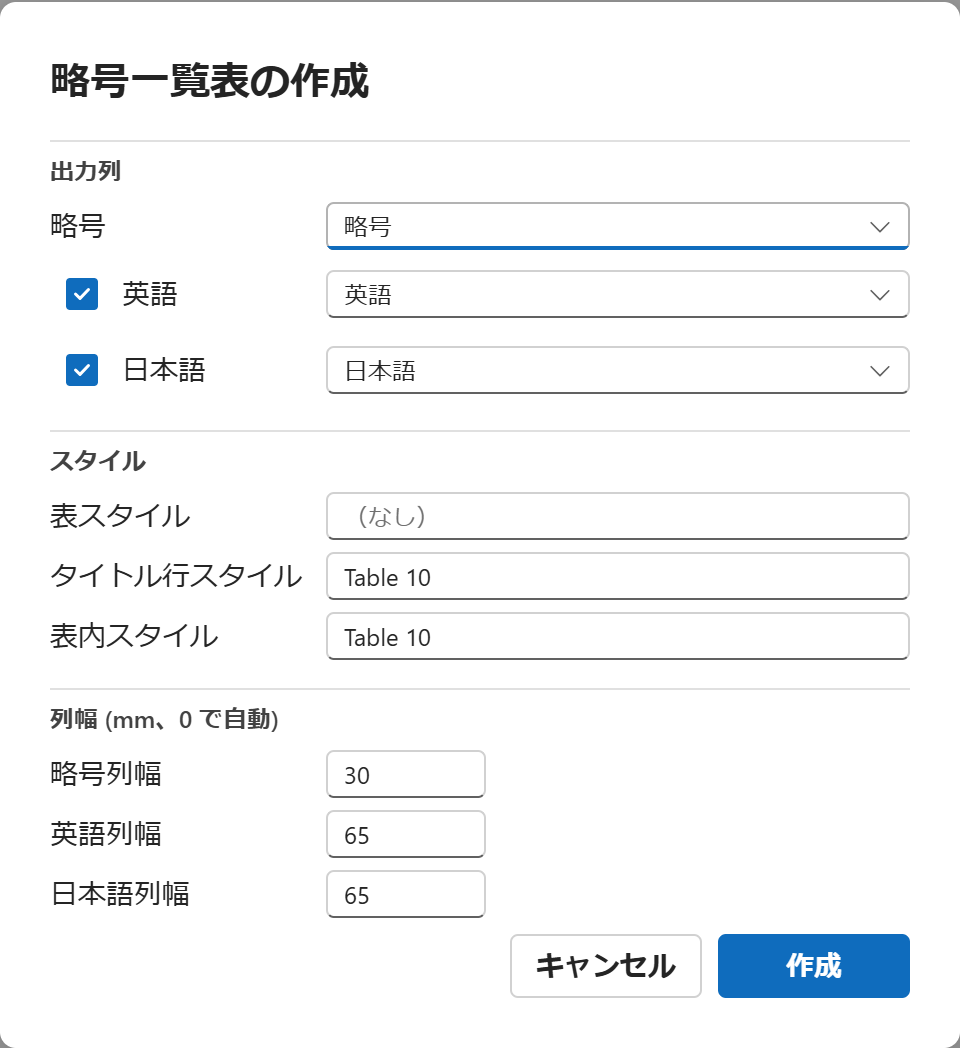
4.5 Creating the abbreviation table
Selecting the [Create] button opens the "Create abbreviation table" dialog. Based on the checked items, an abbreviation table is inserted into the document.
Creation options
| Category | Setting |
|---|---|
| Output columns | Whether to output the English and Japanese columns. At least one must be output. |
| Column titles | The header strings for the abbreviation, English term, and Japanese term columns. Specify them by selecting from candidates or by direct input. |
| Style | The table style, title-row style, and cell style. Specify them by directly entering a Word style name. |
| Column width | The width of each column. Enter a number (mm) directly (0 for automatic). |
Outputting only one term column: If you output only the English or only the Japanese column, the combined width of both term columns is assigned to that column, so the overall table width is the same as when two columns are output.
In each cell, the formatting of the abbreviation and term (subscript, superscript, italic) is reflected. The title row is repeated when the table spans multiple pages.
Differential update
If there is an existing abbreviation table in the selected range of the document and its number of columns matches the number of output columns, you can choose an update method that reflects only the differences into the existing table. When you choose differential update, the items that exist only in the selected table are shown so that they can be identified, and the number of added and changed items is reported.
Choosing [Yes] / [No]: Choose [Yes] to output only the differences, or [No] to replace the entire table in the selected range.
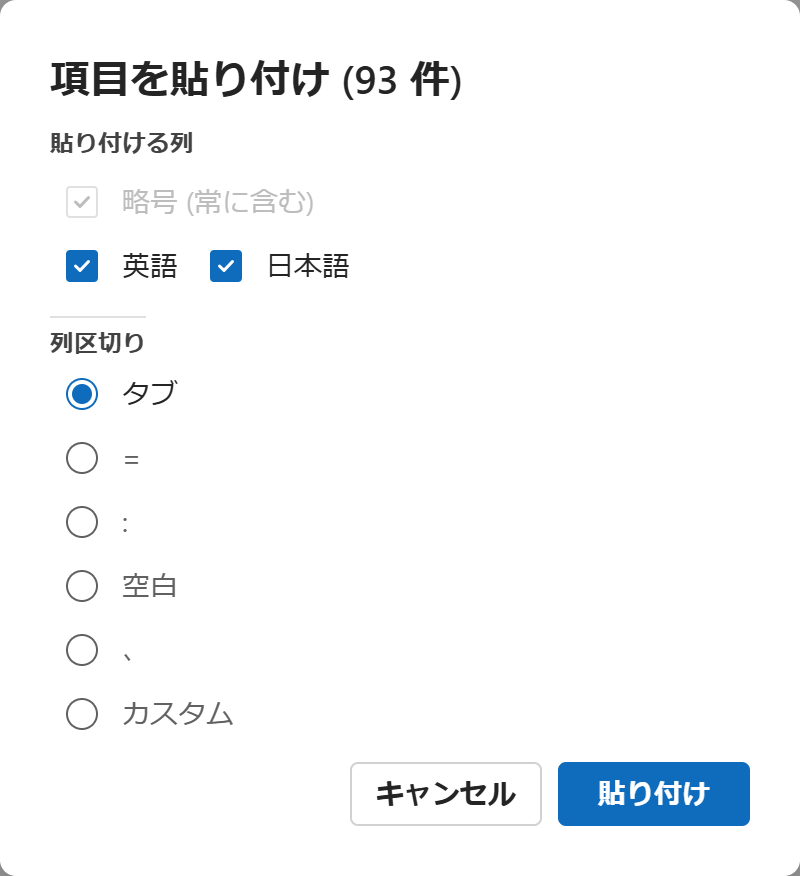
4.6 Pasting into the body
You can paste the abbreviations and terms selected in the abbreviation grid into the document body, according to the delimiter and language filter you specify. Open the "Paste items" dialog from the [Paste] button.
| Category | Setting |
|---|---|
| Columns to paste | Whether to output the abbreviation (always included), English term, and Japanese term. |
| Column delimiter | Tab, =, :, space, comma, or custom (specify the delimiter). |
Pasting preserves formatting (italic, superscript, subscript).
Automatic reload right after table creation or paste: [Create] and [Paste] change the paragraph structure of the document, but a reload is performed internally and automatically right after these, so no warning is shown and you can continue to search and repair.